

Insulation is a surprisingly contentious topic, and a great way to start an argument in the online groups and forums. - Ultimately, you’re going to choose between a few commonly used products, all of which will work, but quite a few people will insist that any deviation from their specific way of thinking is a grave error from which you will never return.
In reality, what insulation is right for you is more about what you want out of insulation, and where you stand on a few key issues. Do you want to be Green and eco-friendly? Do you want it to be easy to install? Will you need to get back into the wall to upgrade or change something? Do you just want Highest R-Value? … Cheapest? … Fastest? How do you feel about Air Quality? Do you think a Moisture Barrier is a good idea? (more on this later)
For those just starting out, one of the first questions asked is whether or not to even Insulate at all. - “Can’t I just leave it the way it is?” “There’s insulation in there already, right?” “Do I have to Insulate my Skoolie, Shuttle, or Van?”
- Yes. You do.
I know it’s tough. You’re excited, full of energy, and ready to get going. You just started your Build, and spending all this time and money pulling off panels and stripping things down for something you’re never going to see again anyway is the last thing you want to do. It may feel like pulling teeth, but is absolutely necessary.
In addition to the obvious advantages for heating, cooling, and sound dampening, consider that not only is this step necessary to find mold and water damage, but it’s the best way to get a feel for how your Bus is put together and the overall quality of construction. Where are the supports and how are they connected? Where are the wires, hoses, and ducting? Where is it okay to drill holes? You’ll even find out if there are any critters living in the cracks and crevices.
The only time you might consider skipping Insulation is if you’re absolutely certain that you’ll only be in this rig for a year or two, you only plan on using it for limited excursions or camping trips when the weather is nice, and it will be parked in your driveway the rest of the time. – Basically, if you never take the bus anywhere that you wouldn’t be comfortable sleeping in a tent. – Beyond that, taking it down to the ribs and re-insulating your Bus is the best time and money you will spend on your Build.
From The Driver’s Seat: Even if you opt to go without Insulating it is still Very important to remove a few panels and check for damage.
What Type of Insulation is Best for a Skoolie or Van?

In the old days, Insulation for pretty much anything meant fiberglass batts with a picture of the Pink Panther on the outside. This Household Insulation was inexpensive and readily available, so we cut and tucked it into every nook and cranny in our Custom Builds. Then, years later, when we went to remodel, we would pull that yucky, wet, gross stuff out of there and throw it away.
Can you still insulate your Skoolie, Shuttle, or Van with Fiberglass? – Sure you can. If I were doing a Build on a very tight budget and someone handed me a truckload of free fiberglass insulation, I would use it, but I would do so with the full knowledge that I’m accepting the potential health risks and damage that can come along with it.
Fortunately, today there are far better options. Havelock Wool, Spray Foam, Thinsulate, Rigid Foam, Reflective Foil, even Denim and Hemp Insulation are considerations. We will discuss upsides and downsides to each of these, but first, here are just a few quick terms that you’ll be hearing a lot of and need to understand.
R-Value: – Insulation is rated in “R-Value”, which is a measure of thermal resistance or heat transfer. You’ll see it stamped on the product as “R-15”, “R-7”, “R-3.9”, etc. In short, the higher the number, the better it is.
It is important to note that Air = R-Value. This is why Insulation comes in loose fibers or open/closed cell foam, and why it is important not to “squish” insulation into tight spots. When you compress it, the R-Value goes down. In many cases leaving an air gap between the product and the wall will even increase its effectiveness.
Thermal Bridging: – This essentially refers to a direct connection to the outside air that allows heat or cold to travel more easily than it can through the surrounding insulation (the path of least resistance). A good example would be the metal rib in your Bus or Van that is attached to the outside wall. When you screw a piece of plywood directly to this rib you’re giving the cold or heat a way to bypass the insulation, defeating the R-Value, or at least diminishing its effectiveness.
Think of stirring a pot of boiling water with a metal spoon. The spoon conducts the heat more easily to your hand than does the surrounding air. If you use a Hot Pad or Oven Mitt you create a “Thermal Break” and the heat doesn’t transfer as well. Not only will you not burn your fingers, but you also actually slow down the heat escaping the pot, essentially blocking its path to your hand.

Likewise, if you use construction adhesive or Butyl Tape on the metal surface between the rib and the plywood, you create a Thermal Break that helps prevent the heat or cold from being “conducted” into the living space of your vehicle.
There are those who go to great extent to create a Thermal Break for every single surface of the Bus, and there are those who ignore it entirely. – My personal take is that you’ll never eliminate all of it, but the more you can do, the better off you will be. It also seems to be more of a factor in colder climates than warmer, but it’s important to note that controlling your Thermal Bridging will also help with condensation, especially in a smaller Rig.
Moisture Barrier / Vapor Barrier: - This one absolutely starts arguments. - It’s a common idea that you should try to seal off your Vehicle from moisture and prevent it from getting into your Bus. Sadly, even if you add an entire additional layer of impermeable insulation in an effort to waterproof your Rig, you still never will. - Moisture is going to get in to your walls and your efforts to prevent that will actually just keep it from getting out. Mold, rot, and rust are products of trapped water. Give it some place to go and you minimize the risk substantially.
Think of the vents on the roof, eaves, and foundation of your house and what they do. - Why are they there? – The idea is to “manage” moisture as opposed to trying to prevent it. - It can be as simple as intentionally leaving small gaps and cracks in your construction that vent into the bus, that you can then evac with your doors, windows, and fans. (This also allows for expansion and contraction of your building materials.) – Remember, any time you create a Moisture Barrier on one side there will be Condensation on the other side. – This applies to the outside walls of your Rig as well…
You will absolutely hear arguments to the contrary, and there are dozens of Videos showing people installing a moisture barrier as if were a foregone conclusion. – More power to them. We just disagree. Your Build is Your Business, but please do your research on this topic before you start trying to seal everything off.
Different Insulation Types and Properties

Havelock Wool: – To cut to the chase, this is our Top Choice. It is extremely popular, especially in Vanlife, and with good reason. - It has the advantage in just about every category. It is lightweight, non-toxic, organic, renewable, easy to work with, and requires no special safety equipment. It doesn’t off-gas, manages moisture (no mold or mildew), it’s fire resistant and, unlike spray foam, it is easy to remove and re-use during the inevitable remodel phase a couple years down the line.
Coming in at a rating of roughly R-7, and a price tag of about $1.50 per square ft., it is competitive, if not better, than all the other common options. While there are certain applications in which another type of Insulation might be more practical, we use wool wherever we can.

It’s also important to note that, for those wanting to be Green in their Build, Wool is the only product that is compostable, biodegradable, and actually improves air quality by absorbing certain toxins.
Havelock Wool is based in Reno, NV and they are quick and responsive with Customer Service. Click the image above to open their website in another window. – Take some time to scroll through the Havelock Wool Site, even if you’re considering a different type of Insulation. They have a ton of useful information.
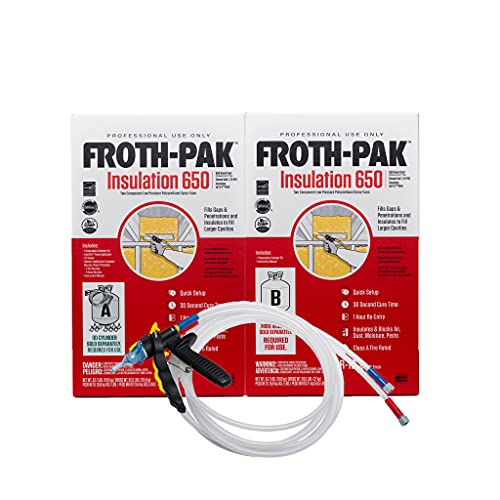
Spray Foam: - Specifically “Closed Cell Spray Foam” is a very popular option in the Skoolie world as it adheres to any surface and spreads to fill gaps and cracks. Additionally, it acts as a moisture barrier (good or bad) and has an R-Value of 5-7 per inch (2” thick would be R-10 to R-14). It also leads in sound-dampening as it completely fills the space in the walls.
The DIY kits are roughly $1000 for 650 sq ft. 1” thick (click the image for current prices) which comes out to just over $1.50 per sq. ft., but the main reason to go with spray foam is the higher R-Value, so you probably want to double that.
You will see arguments online from both sides. Some say that spray Foam is perfectly safe after 24-72 hours, and others, that it continues to off-gas toxins for the life of the product. You will see websites that list it as “Green”, but many more that point out the large carbon footprint and mix of chemicals in both manufacture and application, as well as difficulty in disposal. – It’s also really messy.
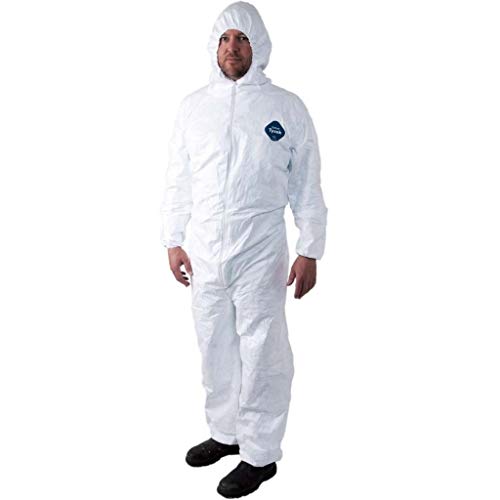
Application requires a full “Bunny Suit”, gloves, and respirator, and there is quite a bit of cleanup (scraping and cutting) after it sets and cures. (It can keep expanding for days.) Between that, the environmental concerns, and the fact that, once you have sprayed, you can’t really access anything under the foam, we tend to shy away from a full-bus application. It’s also why we advise against those considering spraying a coat on the underside of the bus. - You may need to see those brake lines and electrical runs again…
Once again, Your Build is Your Business. There are many that swear by this product and won’t use anything else, but in our opinion, a can of Spray Foam is a great product to fill small spaces or areas that are difficult to reach, but we’d go another way on the main body of the Bus or Van.

Thinsulate: - 3M “Thinsulate”, popular in thermal clothing, is a synthetic fiber that was originally marketed as an alternative to Down (feathers). The main advantages are the high R-Value (5.2) and the fact that it installs at 1” thick for those narrow walls or those with limited height. It costs a bit more than the competitors at $1.80 - $2.00 per sq. ft. (Click Image), but is very popular in Vanlife as it comes in 5’ rolls and will expand slightly after installation to fill metal ribs.
Installation is relatively easy but you will need to use a spray adhesive. - This product is water resistant, there are very few concerns regarding toxins as it’s been around for years in gloves and clothing, and we can’t find any reports of off-gassing.
Were Wool not available, this would be our recommendation. - It’s a good choice for your roof or floors if you are trying to conserve height.
Rigid Foam: - You’ll almost certainly use Polystyrene Foam Boards somewhere in your Build (likely the floor). They are easy to work with, the highest R-Value for the price, and require no special equipment, although you’ll most likely use a spray adhesive to install them, and they can “squeak” if not properly affixed.

There are 3 main types; EPS (Expanded), XPS (Extruded), and ISO (Polyiso). R Values can vary from R-3.9 to R-5.8 per inch and prices range from 60 cents to $1.50 per sq. ft. There are several opinions out there (Article), but we tend to lean toward EPS as it seems to be the most stable. XPS can off-gas, and ISO can lose R-Value at colder temps. Click the image to check Amazon, but with all the variables, you’re best to pick these up locally in full sheets.
A Common question that comes up is, “Can I lay my plywood subfloor directly on top of my Rigid Foam Boards, or do I need to use Ribs/Floor Joists/Cross-Members?”. – You can, and a lot of people do, but the unfortunate reality is that, while it is doable, and eliminates thermal bridging, the likelihood that you will get plywood from a big box store that isn’t warped, twisted or bowed is almost nil. You can put it on the ground and park your Bus on it for a month to try and straighten it out, but if you’re like me you don’t have that kind of patience. This means that you’ll need to screw your subfloor down to ‘something’. We’ve seen people run long screws all the way to the metal floor of the rig, but our suggestion is to go ahead and put in some ribs/cross-members for nailers and structural support. (it is far better for structural support.) You can use adhesive to affix them to the floor or butyl tape on top to help minimize thermal bridging.
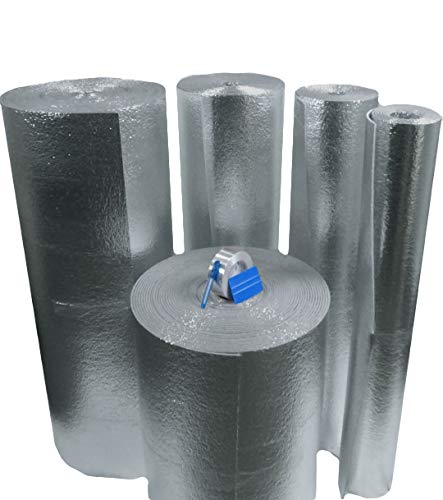
Reflective Foil: – Designed, as the name implies, to reflect sunlight, when buried in a wall where it never sees the light of day it acts as little more than a vapor barrier. – It does work, if properly installed, but if put in direct contact with an outside wall it is not an effective Thermal Bridge.
If you grew up in a colder climate you no doubt have experience with plastic covering the windows of your house in the winter, and this is sort of the same theory. The air pockets (think bubble-wrap) add a substantial amount of R-Value to the product, but I think the R-8 that the manufacturer claims is specific to blocking sunlight.
You absolutely can use a layer of this product to beef up your existing insulation, perhaps taking an R-5 up to an R-8 or even higher. At less than $1 per sq. ft. it is the cheapest of all the options, but it doesn’t seem to be particularly effective as a stand alone product.
For the price, it’s great to have on hand to supplement existing Insulation. – It also makes great window shades, or even curtains.
RockWool: - Seen in your local big box store, you’ll be tempted to get this product as it shows R-15 on the packaging, and it is Wool, right? - Technically, it is basalt and slag (a byproduct from steel production). - It’s a decent insulation, but uses formaldehyde in production and is known to off-gas continually for the life of the product. Reputed to be worse than Fiberglass for air quality, I would not use this in a confined space like a Van or Bus, even if it was free. The Rockwall Rigid Boards are a viable alternative for floors, but they’re much more expensive than EPS for about the same R-Value.
Recycled Denim / Cotton: - This is an awesome (possibly) Green product. It’s a great idea, and if I were building a sticks and bricks house in a very dry climate, I would consider it. Sadly, it is the opposite of moisture management. It will get wet. It will smell, and it will mold. - If you are considering going through your closet and using old jeans and t-shirts for Insulation, this is why you shouldn’t.
This is a cool idea, just not great for a Bus or Van application. - We were also surprised at the sheer volume of chemicals used in the manufacturing process.
Hemp: - Insulation made from Hemp exists, and it’s reputed to have a great upside. Sadly, it is difficult to find (especially in the U.S.) due to the lack of availability of the main ingredient. - This may be a more viable option in a few years, so we’ll keep an eye on it. - Let us know if you’ve used this product or have any further info.

Most of us usually wind up going with a combination of Rigid Board on the floor and possibly the ceiling (due to height restrictions), a little Spray Foam in the hard to reach areas, and one of the top three (Havelock Wool, Spray Foam, or Thinsulate) for the main body of the vehicle. – It’s a good idea to do a search for videos showing installation of each and, while we didn’t have room to cover it in this article, there is also a difference in how you should Insulate for a warm vs. cold climate (some good videos on that as well).
Stay Warm! Stay Cool! And Stay Nomadic!
Quick Links:
Start The Engine - Establishing a Budget - Making a Living on The Road - Choosing a Rig - Do I Need A CDL? - Designing a Skoolie Build - Step By Step Build Order - Skoolie Toolbox - Doing a Build On The Cheap - 10 Tips to Save Power and Money - Skoolie Build Ideas - Solar 101 - “Inverter/Charger/Switch” or 3 Separate Devices - Simple Solar - Solar Cheat Sheet - Step by Step Solar - Water Setup - Propane Setup - Skoolie, Van, & RV Air Conditioning DE_Mystified! - Skoolie Heating - Insulation - Digital Nomad Connectivity - Choosing a Domicile State - Converting a Commercial Title - Van, Skoolie, and RV Insurance - Camping Clubs, Subscriptions, and Passes - Road-Skool / Home-School - The Simple Skoolie Kitchen
Jump To Page:
Home - Tutorials - Solar - Cooking - Refrigeration - Water - HVAC - Tech - RV Accessories - Gear - Swag.