
Is there a Simple Skoolie Solar Setup? - Easy Vanlife Solar? - Yes. There is! - and the entire system can be done for less than $3000.
Click/Tap To Enlarge.
A Skoolie or Vanlife Solar Setup is typically the most intimidating, confusing, and expensive part of your Build. Shortly after starting the research, you'll notice conflicting answers. You'll see videos of small Vanlife Solar Setups with one or two Solar Panels, and Full Size Skoolies that have “covered the entire roof”. You'll see massive Battery Arrays, and people with a single Battery and a Folding Solar Panel. Several people in groups and forums will tell you , “There's only one way to do it, and if you don’t buy the most expensive components there will be dire consequences”.
Not So.
If you have unlimited funds to put toward your Solar Setup, then, by all means, do it, but you don’t need to pay for a Ferrari when a Chevy will get you there.
The truth is, there several ways to power your Bus or Vanlife Solar. You can do anything from just using a Jackery and a power strip, up to spending tens of thousands of dollars for a system that will (allegedly) run an industrial welding operation, but one of these is probably not enough, and the other is way too much.
What you want is a functional Electrical System that supplies the power you actually use, without taking up half the Rig or forcing you into poverty.
“So, How Much Solar Do I Need?” This is typically the first question asked, but really not the right way to ask it. Think of it like this: - How much electricity do you use, and what charging capabilities does your system need to maintain that? - You could try one of the online “Solar Calculators” and, inevitably, come up with numbers substantially higher than what we're about to show you, but bear in mind that these people are trying to sell you something. - Also, remember that your Bus or Van doesn't work like your house or apartment. You will use electricity much differently on The Road. - Our Solar Cheat Sheet is designed to help sort all of this out, but the vast majority of people on The Road are quite comfortable with a System fairly close to what we are going to describe below.

In this article we are going to tell you the exact sizes needed (including wire gauge) and the specific products that we used in our most recent Build. Additionally, we will suggest some areas in which simple upgrades will give you a little bit of a boost, without breaking the bank. We'll also discuss places where you could potentially downsize a bit and cut your overall cost.
This is a Simple Solar Setup that is perfectly sufficient for most Nomads, and comes in at a total price tag of around $2800. (Prices are subject to change, of course, and may vary by your geographic location, so click the images below to compare current costs.)
Have a look at our Solar 101 Tutorial before you start hooking up and plugging in, but anyone with moderate DIY skills and the proper tools should be able to confidently construct this System.
The Solar Setup below will run Lights, Laptops, charge electronics, power an Induction or Infrared Cooktop, a Refrigerator, Microwave, TV, Cell Signal Booster, The Bosch Mini Electric Water Heater, 12v Water Pump, and even a Hair Dryer (though we recommend the “cool” setting). Most Nomads go with pour-over coffee, but this Setup will power the Keurig that we feature on our Cooking Page. - With this, or any system, you'll want to run your 120v appliances one at a time until you get a feel for what drains the most juice, and may decide to upgrade based on those specific needs.
This System is Not designed to run a full size Air Conditioner on it's own. It will do so with an assist from Shore Power or a Generator, but if you wish to run AC 24/7 strictly from Solar, you're going to need a much larger system than this. *Please see our Air Conditioning DE-Mystified Tutorial for more information.
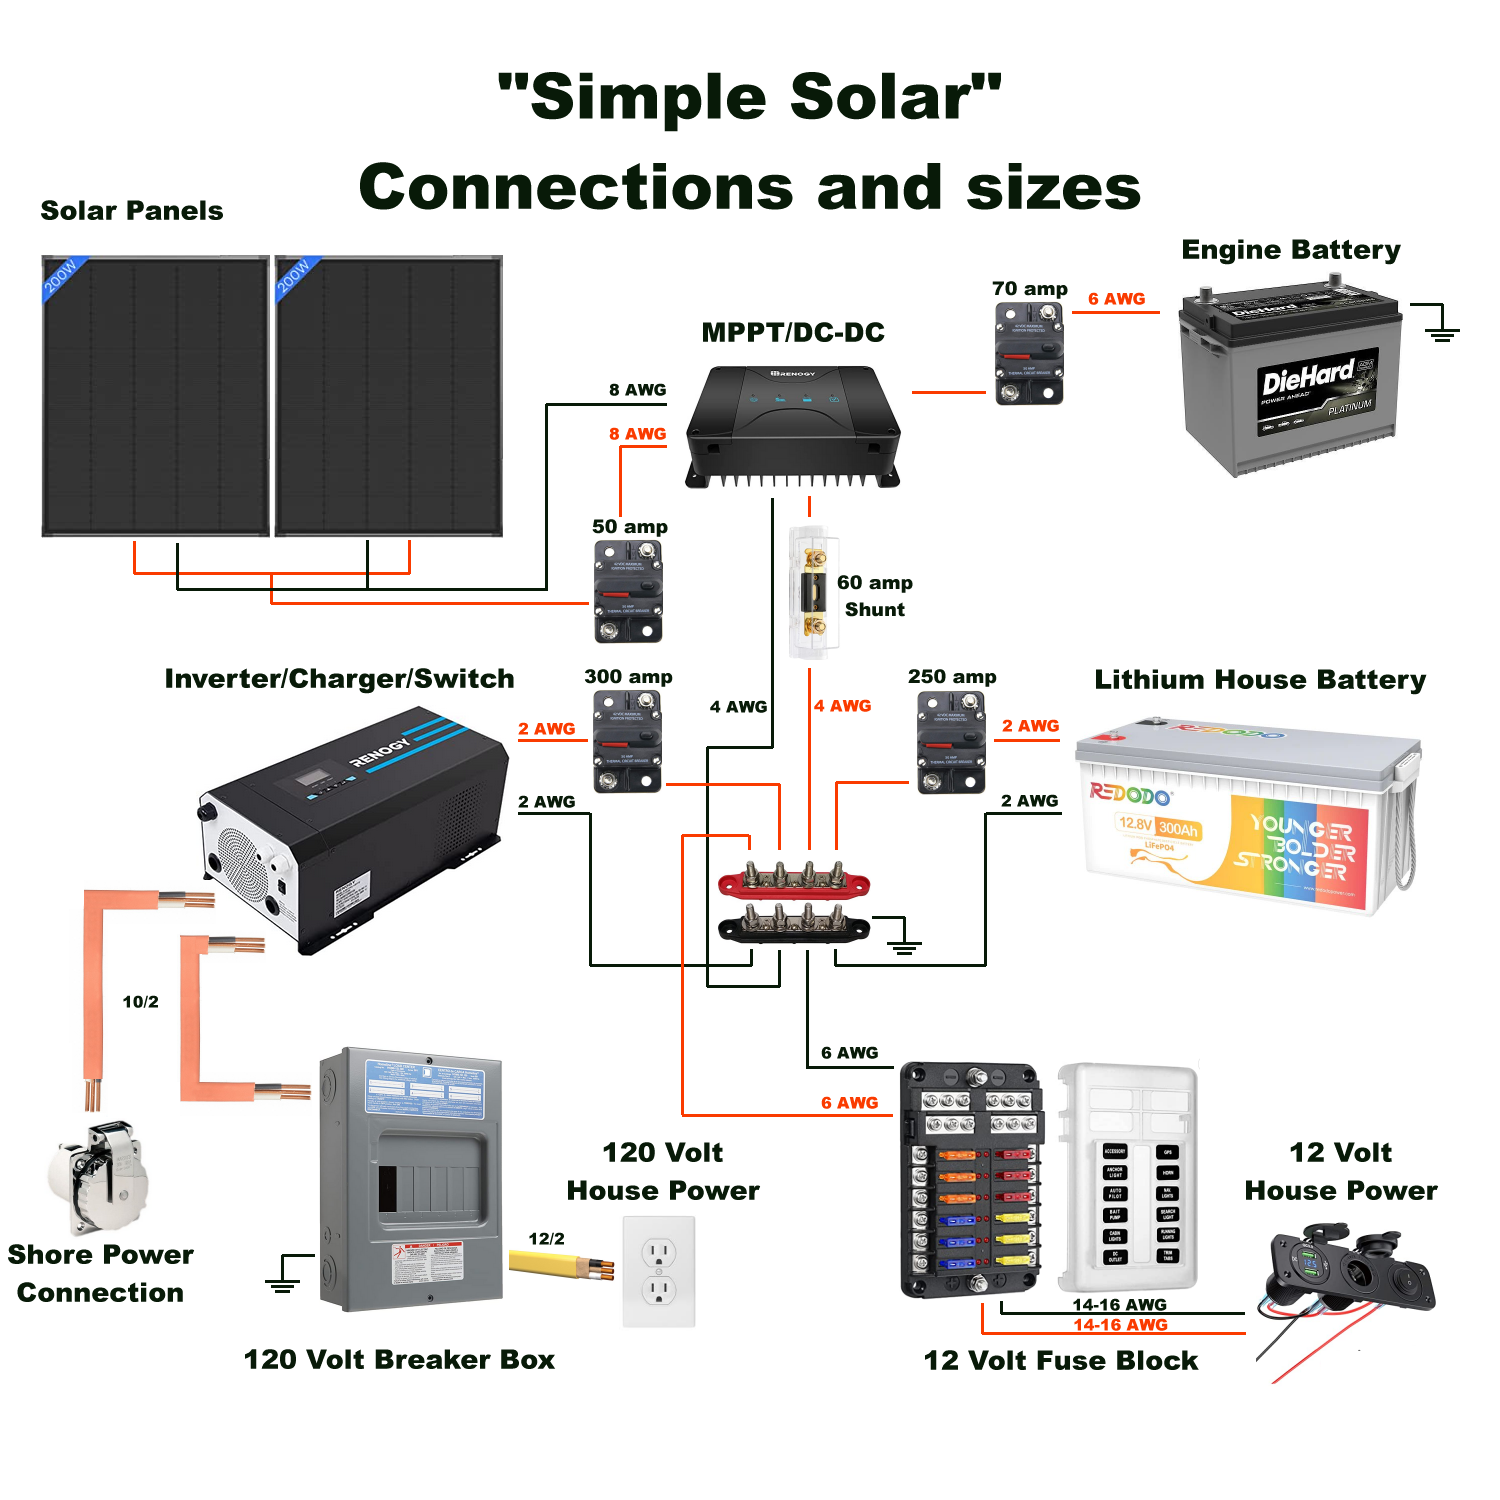
This Solar Setup has only 6 major components: 400watts of Solar Panels, A 50amp combination Charge Controller and DC-DC Charger, a 300amp hour Lithium Battery, a 3000watt combination Inverter/Charger/Transfer Switch, a 12 volt Fuse Block, and a 120 volt AC Breaker Box. - In addition, you will want a 12 volt Distribution Block, some in-line DC Breakers, wire, connectors, and your 12 volt and 120 volt sockets/receptacles. - We will tell you the sizes as we go.
Please Note: It is Very Important that you hook up your Solar Panels Last. It should always be the final step in constructing this (or any) Solar Setup. - If any light is hitting your Solar Panels, they are a “live wire”. Plug them in to your system only after you have built and tested all of the other components and connections. See our Step by Step Solar Article for a suggestion on the order of connections.
Let's get to the nuts and bolts!

Solar Panels: We used a pair of 200w Alrska Solar Panels hooked up in Parallel (+ to +, - to -) for a total of 400 watts at 12 volts. We chose these specific panels because of their compact design and shingling technology, which makes them far more efficient than most other panels. (These two panels put out roughly the same charging capacity as our former array, which was 540 watts.) Click the image to check them out.
Upgrade/Downgrade: Bumping this up to around 500 watts is an inexpensive way to increase charging capacity, and a good idea if you don't drive very often, or if you spend a lot of time in cloudy climates. Click here to visit the Alrska Store. They offer various wattage and sizing options, as well as high quality Flexible and Portable Solar Panels.
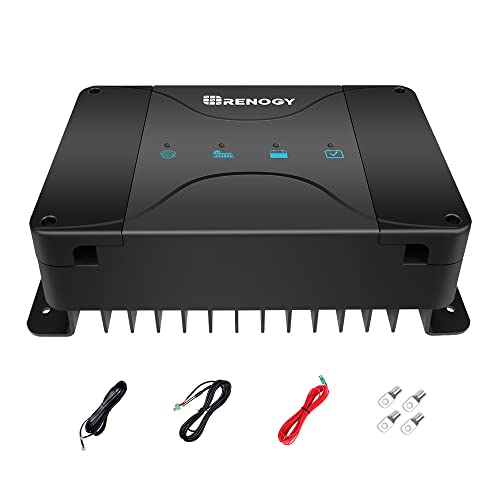
Combination MPPT/DC-DC Charger: This unit is both an MPPT Solar Charge Controller and a DC-DC Charger, meaning that it will charge the Battery from both the Solar Panels and The Engine Alternator (Battery). This eliminates the need to buy 2 separate components, saving time, money and space. Additionally, it comes with very easy to follow instructions.
Upgrade/Downgrade: This product is currently only available in 50 amp and 30 amp versions. We suggest going with the 50 amp, even if you start out with a smaller Solar Array, giving you room to expand later. - Please note: if you decide to go with over 500w in Solar Panels you will not be able to use this combination item, and will need a separate MPPT Charge Controller and DC-DC Charger. Options are available on the Solar Page as well as our other Tutorials: Solar Cheat Sheet, Step by Step Solar.
Here are the items you will need to connect The Solar Panels to the Charge Controller: Solar Panel T-Connector (8 AWG or “8 Gauge”), 50 amp Breaker.


To connect the Engine Battery to the Charge Controller you’ll need 6 AWG wire and a 70 amp breaker. Note: You will only need Red wire as the negative connection is accomplished via the System Ground. Additionally, if this run of wire needs to be more than 20' to reach the Charging Unit unit from the engine battery, you'll want to upgrade to 4 AWG wire. - You will also need 4 AWG (“4 gauge”) wire to connect the Charger to the House Battery. The Shunt, included with the unit, goes inline on the positive side before the 12v Distribution Block.


From The Driver's Seat: If you have a decent Electrical Supply Store nearby, we suggest that you shop local, and buy the various sizes of wire by the foot, with the appropriate connectors. You can then custom build your wires, keeping them shorter and easy to manage, as well as making your System more efficient and cutting costs substantially. You'll need a crimping tool to do so.
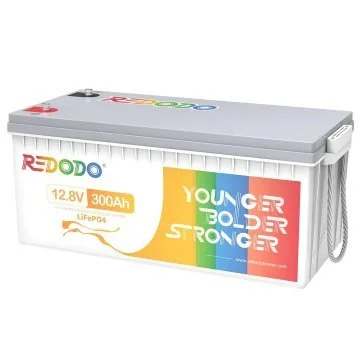
300ah Lithium Ion Battery: Redodo is our choice for Lithium Batteries due to quality, quick shipping, low cost, and great customer service. Your Battery will be the most expensive part of this Setup, but it is also the most important.
Upgrade/Downgrade: We went with the 300ah in this Build because it fit into a specific space. It is sufficient, but we would recommend going with 400 amp hours, or more if you have it in the budget. Battery capacity isn't only how long you can use power, but also how much power you can use. Click the image to go directly to the Redodo Store and use Coupon Code: Skooliesupply941 for an additional 5% off at checkout.
Connect The Battery to the Distribution Block with 2 AWG wire. You should include a 250 amp breaker that will also act as your Battery Shutoff. - You will also use 2 AWG wire to ground the Distribution Block to the chassis of the vehicle.


Tech Tip: Using One Larger battery vs. multiple smaller ones saves, not only money, but also increases efficiency by limiting loss (resistance) in additional connections and wiring.

Combination Inverter/Charger/Transfer Switch: You may have heard some negative feedback for Renogy in the online groups and forums, and while they can be a little slow to reply, they are also one of the oldest companies in this industry. You simply don't get to be that if you don't make quality products. There has been something “Renogy” in every Build we've ever done and in almost every Build we've seen. - We've never had an issue. - Click the image to view the product on Amazon, scroll to the bottom, and read the reviews. - Like their Charger, above, This replaces 3 separate items, and it makes construction far more efficient and simple. Click the image and scroll down for an easy to follow connection video on their page.
Upgrade/Downgrade: If you use propane to cook and heat water, and you're fairly light on the rest of your power usage, you can get away with the 2000w version of this. You might also consider the smaller unit if you run a 120v fridge and have to leave your Inverter on. (A 12v Cooler-Style Fridge will save you substantial power. See our Refrigeration Page for options.)
You will need 2 AWG wire (see above) to connect to the Distribution Block through a 300 amp Breaker, and 10 Gauge (10/2 with Ground, 120v/30a) wire to connect to both your Shore Power Connection and your 120v Breaker Box.


12v Fuse Block: You will use standard automotive fuses for your 12 volt house power. They come in various sizes and shapes, but we like the one in the image, as it has LED indicators to show when a fuse is bad, includes fuses, a cover, and is pretty simple to hook up.
You will need a little more 6 AWG wire (Black & Red) to connect the Fuse Block to the Distribution Block. Your 12v House Wiring will be accomplished with 14-16 Gauge Red/Black wire (lights and 12v Outlets). While it's slightly more efficient to use smaller wire in some cases, we typically use 14 Gauge throughout. This accommodates unexpected power draws on the same circuit as well as longer runs of wire. Click here for a chart of 12v wire size suggestions. - Several options for 12v lights, switches, and sockets are available on our Lighting Page.


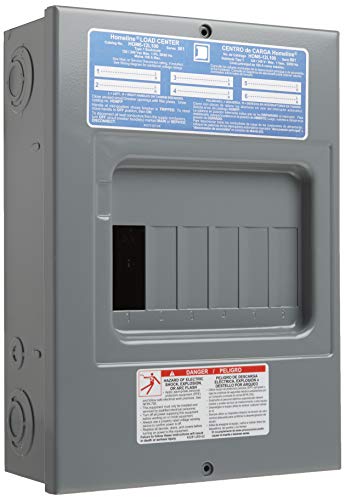
120v Breaker Box: Square D makes a great little Breaker Box that is perfect for Skoolie and Vanlife Solar Setups. It is occasionally out of stock on Amazon, but can also be picked up at your local big-box store. It will handle 6 separate circuits, or 5 and a “Main Breaker” (recommended). See the Step by Step Solar Tutorial for Breaker Sizing.
You’ll use 10/2 with ground (see above) to connect both the breaker Box and your Shore Power Connection to The Inverter, and 12/2 with ground for your House 120v wiring. You will also want a length of green 10 Gauge Ground wire to run from the breaker box to the chassis.


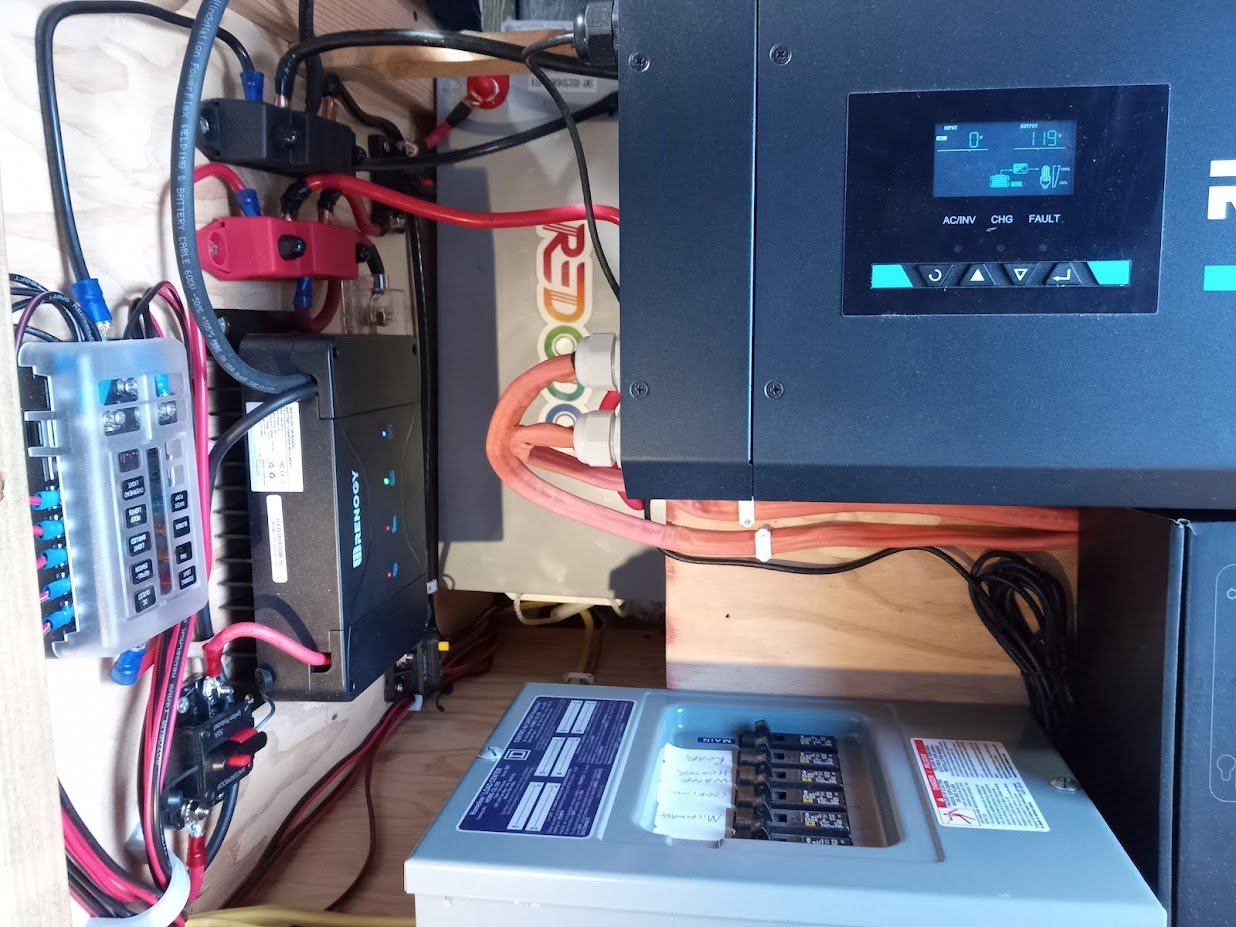
As noted, we are running this exact setup in our current Rig, and it is more than meeting our needs. Click the image to see a larger view of the actual setup.
Hopefully this article saves you some time and headache and, even if our “Simple Solar Setup” isn't perfect for your needs, we hops that we at least gave you a good starting point.
-Freedom is closer than you think!
Quick Links:
Start The Engine - Establishing a Budget - Making a Living on The Road - Choosing a Rig - Do I Need A CDL? - Designing a Skoolie Build - Step By Step Build Order - Skoolie Toolbox - Doing a Build On The Cheap - 10 Tips to Save Power and Money - Skoolie Build Ideas - Solar 101 - “Inverter/Charger/Switch” or 3 Separate Devices - Simple Solar - Solar Cheat Sheet - Step by Step Solar - Water Setup - Propane Setup - Skoolie, Van, & RV Air Conditioning DE_Mystified! - Skoolie Heating - Insulation - Digital Nomad Connectivity - Choosing a Domicile State - Converting a Commercial Title - Van, Skoolie, and RV Insurance - Camping Clubs, Subscriptions, and Passes - Road-Skool / Home-School - The Simple Skoolie Kitchen
Jump To Page:
Home - Tutorials - Solar - Cooking - Refrigeration - Water - HVAC - Tech - RV Accessories - Gear - Swag.