Updated 1/24/2022
A Skoolie, Vanlife, or RV Solar Setup is typically the most overwhelming and confusing (if not outright frightening) part of the process. It comes with variables upon variables and math upon math, with each new number seemingly changing all of the others. - You can do weeks, months, or even years of research on the topic and still not have a clear idea of what it is that you actually need to get your electrical system up and running. The internet is full of numbers and stats, as well as several websites and calculators that will contradict each other, or tell you to spend tens of thousands of dollars on massive Solar Arrays and Battery Banks… (and then there’s more math).
Is it really necessary to understand how every photon of light is processed just to get your Bus or Van on The Road? - No. it’s not. - There’s a lot to it, and you need to get it right, but you don’t really have to dig into 500-level Electrical Theory just to get it done.
The truth is, all of this math will probably change once you're out here. However, at that point you will have a much better understanding of how it all works and what you actually require. Right now you just want someone to tell you what to get and how it all goes together. - You've got other stuff to do.
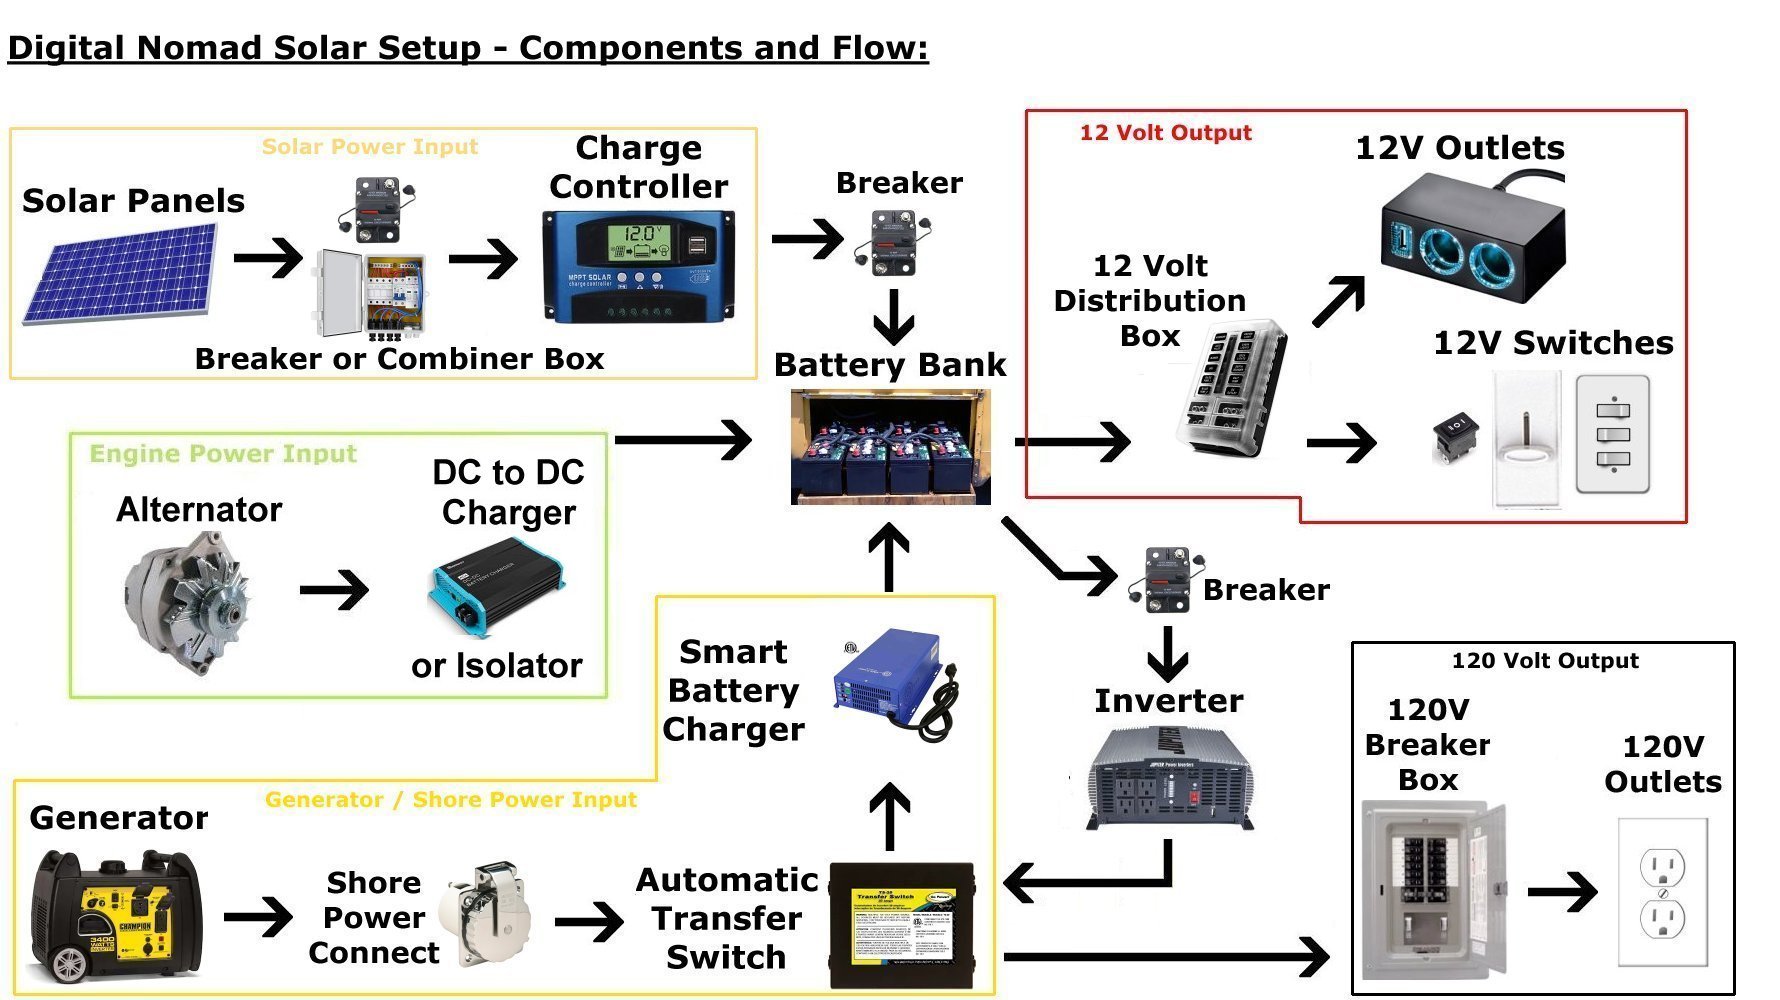
The image above is a chart that shows how everything connects, and in what order. Click to enlarge and keep it open as a reference as you read through this Tutorial. - Hang in there… You Got This!
We also have a straight-forward “Step By Step Solar” Tutorial that will show you both what order to assemble the pieces and how to do it one element at a time if you’re on a budget.
“What Solar Components do I need for my Rig?” “It doesn’t have to be perfect. I just want it to work, and not cost as much as the GDP of a third world country.”
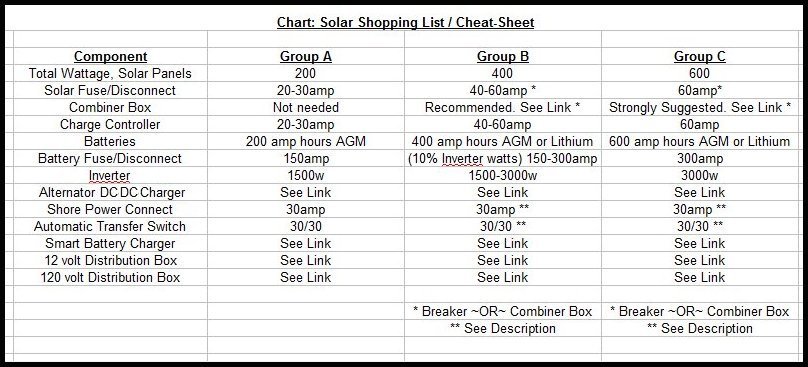
You're in the right place. - Read through our Solar 101 Tutorial to gain a deeper understanding of Electrical Theory and terminology, but if you just want the Shopping List / Cheat-Sheet, Here ya go!
Disclaimer: We are not Engineers or Electricians. Our goal is to suggest the components needed for a functional, straightforward Skoolie, Van, or RV Solar System. Consult a professional if you have any questions or concerns.
The best plan is to Start Small and Scale Up: - It's better to make adjustments after the fact (and you probably will) than it is to spend more than necessary up front. You want to start with the minimum that you think you'll use, and then add components from there. - Fortunately, it's relatively easy to do so.
What the calculator sites and videos don't tell you is that most Nomads fall into one of three usage groups. You can think of them as “Small, “Medium” and “Large”, but we'll call them Group A, Group B, and Group C. - See the descriptions below and look at “How Much Solar Do I Need?” Obviously, everyone’s usage will vary. - You can adjust the numbers up for headroom or down for economy as you see fit.
Group A: - “Small”. This is 1-2 adults who do all of their cooking and water heating with Propane. House Heating and Cooling Systems are Not Connected to Solar, all of the lighting and charging stations in the Rig are on the 12 volt system, and they use a 12 volt Cooler-Style Refrigerator. They only turn the Inverter On to use a Microwave, Coffee Maker, or other small Appliance (all rated at 1500w or less), and then turn the Inverter Off as soon as they're done.
How Much Solar Do I Need? (Group A): - 200 watts of Solar Panels, 30 amp Charge Controller, 1500w Inverter, 200 amp hours Batteries, 30 amp Shore Power/Transfer Switch, DC-DC Charger, Smart Charger.
Group B: - “Medium”. 1-2 adults, perhaps 1-2 kids, who alternate with an Induction/Infrared Cooktop and a propane camp-stove or single/double burner drop-in. Hot Water is used sparingly (Propane or high-efficiency Electric). Heating is accomplished with Propane or wood, but a small or portable A/C can be used sparingly. All of the lighting and charging stations in the Rig are on the 12 volt system. They might get away with a 120v Fridge, however, a 12v Cooler-Style would allow them to shut the Inverter Off when not using Appliances (as with Group A), thereby stretching Power substantially.
How Much Solar Do I Need? (Group B): - 400 watts of Solar Panels, 40-60 amp Charge Controller, 1500w-3000w Inverter (depending on use of 120v Appliances), 400 amp hours Batteries, 30 amp Shore Power/Transfer Switch**, DC-DC Charger, Smart Charger.
Group C: - “Large”. This applies to families of 4 or more, or those with regular use of 120v / high wattage Appliances and occasional A/C (with a Generator or Shore Power assist). The Inverter is left On most of the time, whether for convenience or to run a 120v Fridge. They have a minimal or Propane Free Build, only using a portable camp-stove or Buddy Heater from time to time. - Essentially, if Group B looks “light” to you, you're probably Group C.
How Much Solar Do I Need? (Group C): - Start with 600 watts Solar Panels, 60 amp Charge Controller, 3000w Inverter, 600 amp hours Batteries, 30 amp Shore Power/Transfer Switch**, DC-DC Charger, Smart Charger. - Be prepared to adjust these numbers up or adjust your usage down.
Wait. That’s All?: - Yes. A common mistake when first considering Solar is to assume that you're going to put together a System that behaves exactly like the one in your current house. - It won't. - The habits we've developed and appliances we use while getting our Power from “The Grid” are very wasteful. Those online Solar Sizing Calculators assume that you are going to continue those wasteful habits once on The Road. - You're Not. - If you're going to make it as a Digital Nomad, you're going to adapt to using resources more efficiently. It's not really a huge leap, but there will be certain adjustments. See our 10 Tips to Saving Power Tutorial for some ideas.
In practice, the biggest stumbling block is usually Air Conditioning (or another high wattage 120v appliance). Simply put, it will take three or four times the amount of Solar Panels and Batteries shown above to run A/C solely off of your house Electrical System. - That’s three or four times the space and three or four times the expense over what you need to meet all of your other Power requirements, combined, all for a single piece of equipment that you might only need a few months out of the year.
If you have the budget for it and you absolutely have to run your A/C from Solar, by all means, go for it! - You’re looking at somewhere around 2000 watts of Panels and 8-10 Lithium Batteries on a 24v or 48v setup. That’s a great system if you can afford it. - In truth, however, even with a setup that large, you will likely find that you’re still commonly plugging into Shore Power or firing up the Generator to do so. - Have a look at our AC De-Mystified Tutorial for more info.
Important Note: - The suggestions below are for a 12 Volt System wired in a Parallel Configuration. It's the easiest way to hook it up, and works perfectly well until you get over about 800 watts of Solar Panels. At that point you should consider a 24 or 48 volt system. The components will still be the same, but the sizing will be different. - Our suggestion is to start with one of the “Groups” we list here. - If you decide in the future to switch to a 24v or 48v setup, it is relatively easy to make the change down the road. Look for an upcoming Tutorial specific to that topic.
Additionally, we’re assuming an average amount of sunlight. - If you spend winters in the Pacific Northwest you’d better bump it up a Group, and secure a reliable Shore Power Connection.
Solar Shopping List / Cheat Sheet
Below are our recommendations for each item. Match them with the list in the Chart. Take a look at our Solar Page if you need additional Options.
Special Note for Group A: - Consider this RV Solar Kit. - You will need an Inverter, Batteries, and a DC-DC charger, but it includes a 40 amp Charge Controller, so it's easy to add Panels later if needed. If you're conservative with power, this setup might be all you need. Click the Image to check it out.
Solar Panels: - The short answer is to go with Monochrystalline Solar Panels. Polychrystalline are a few dollars less, but this is an area where it’s worth the upgrade.
Caution: Connect your Solar Panels Last. Be sure everything else in your installation is complete and correct before you harness the power of the sun ;) .
Solar Panel Disconnect: (Group A, B*) - Your Solar Panel Disconnect (between the Panels and the Charge Controller) should be equal to or less than the amp rating on your Charge Controller. Click the image for various sizes.
Combiner Box: (Group B and C) - Any time you are connecting 3 or more Solar Panels a Combiner Box is highly recommended. This will include a Solar Disconnect Breaker. The one featured is rated for up to 4 panels and 700 watts. A 6-Panel Version is also available.
Tech Tip: Solar Panels typically come with 10 Gauge Wire. If your total Solar Wattage is 360 or more use thicker, 8 Gauge, wire to connect the Combiner Box to the Charge Controller. Between 480 and 660 watts use 6 Gauge.
Charge Controllers: - On a 12 volt setup, your Amp Rating should equal 10% of your Total Solar Panel Wattage or more (300 watts = 30 amps, 400 watts = 40 amps, etc.). It's not a bad idea to get one size greater if you think you might add panels later. - See the Solar Page or Solar 101 Tutorial for more information about comparing PWM and MPPT Charge Controllers.
Batteries: - Lithium is far superior, and while also more expensive, prices continue to drop. AGM Batteries are a viable choice if you’re on a budget (or small system), but our choice is the Redodo Lithium Battery shown below. using a single 300amp hour battery saves space and cable cost and will likely do just fine for Group A or B. - They offer various sizes (including a 400ah option). Click the image to go directly to their website and enter cupon code: SkoolieSupply for an extra discount.
Buss Bars (Bus Bars): - Several things will connect to the Positive and Negative leads of your Battery Bank. These Buss Bars, or “Power Couplings” will not only ease future maintenance, but greatly simplify your initial installation.
Tech Tip: - For various safety and efficiency concerns, always use cables of the Same Length when connecting batteries in Parallel.
Additionally, prevailing thought is that you shouldn't hook up more than Four 12v AGM batteries in Parallel Configuration. - This means that for systems of over 400 amp hours you should consider Lithium, or go with 200 amp hour Batteries (Click Here).
** Remember to Ground your Battery Negative to the frame of the Rig! - It’s important.
Battery Disconnect: - (Between The Batteries and the Inverter) Your Inverter likely comes with a fuse, but a Disconnect Breaker equal in amperage to 10% of your Inverter Wattage is a good idea. (A 1500w Inverter = a 150 amp Breaker.) Click the image and select the appropriate size.
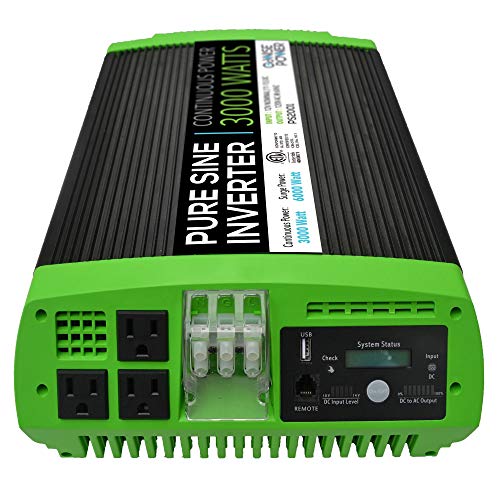
Inverters: - Look at the Wattage rating on your appliances. An 1800w hair dryer will pop the breaker on a 1500w Inverter. Likewise if you run multiple appliances at once.
Group A and B should do fine with 1500w (Group B might consider an upgrade for a 120v Fridge or heavy appliances). Group C should start with the 3000w option.
Both featured Inverters come with a remote switch.
Tech Tip: Always Turn the Inverter Off when connected to Shore Power. Otherwise it will continue to draw (waste) Power from the Batteries, and could potentially create a “charging loop”.
DC to DC Charger: This uses the Engine Alternator to charge your House Batteries (once the engine battery has sufficient charge).
An Isolator Switch will work well with older vehicles and Lead Acid or AGM Batteries, however, the demands of Lithium Batteries on an Isolator Switch may overload and damage your Alternator.
DC to DC Chargers optimize House Battery charging while protecting the vehicle’s electrical system. In short, if you are using Lithium Batteries, in a newer vehicle, or recently upgraded your Alternator, a DC to DC Charger is your best bet. See the Solar 101 Tutorial for more info.
Group A: AGM Battery Banks shouldn’t exceed 30% of total amp hours (100ah = 30amp, 200ah = 60amp) Size the DC-DC Charger accordingly or use the appropriate Breaker in line between the Isolator and the Batteries .
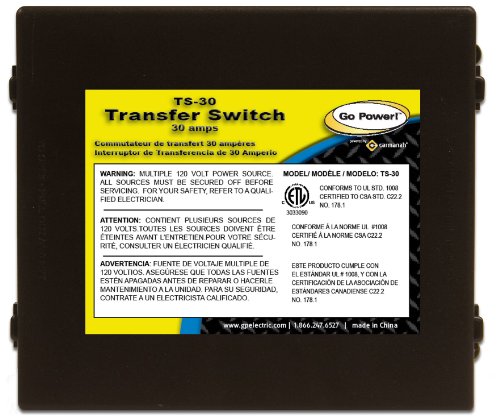
Shore Power Connect, and Transfer Switches: - Your Shore Power Connection and Transfer Switch need to be Equal in amperage. (30 amp Shore Connect = TS 30/30. 50 amps = 50/50.)
**Most RV Parks use a 30 amp hookup for Shore Power. Some will have a 50 amp option. The main argument for getting a 50 amp Connection and Switch would be if you want to connect to a 50 amp Generator or 50 amp Shore Power, when available. - Unless you are running more than 3600 watts at once, or want faster charging for a large Battery Bank, you shouldn't need a 50 amp service.
Smart Battery Charger: - The Go Power Smart Charger is a great unit for the price. It comes in various sizes. Click the image for the 100 amp version or This Link and scroll down for various other sizes. (Maximum charging current is 30% total amp hours for AGM, or 50% for Lithium. Be sure you read the instructions.)
Tech Tip: You can simplify your Setup by combining the Inverter, Smart Charger, and Transfer Switch into a single “All-In-One” or “Combination Unit”. Read through this article for more information.
12 Volt and 120 Volt Distribution / Breaker Boxes: - You need Distribution for both your 12v and 120v System. - Here is a suggestion for each, but the final size will be determined by the specifics of your Build. Click the images to compare options.
You might only need 5-6 fuses or breakers at first, but leave room for expansion. A dedicated line for each heavy wattage item is a good idea (Fridge, Microwave, AC, etc.), and perhaps one for sensitive electronics. We suggest two lines for Lights and two for 12v Outlets.
Tech Tip: Leave some of the original (pre-Build) 12 volt Lighting intact as a backup.
(Distribution Boxes) Fuse and Breaker Size: - We’ve included a diagram as a visual aid, but this will ultimately be determined by the Appliances in your Build. Most lighting and small appliance circuits will run fine on 15 amps, but check the Amp Rating on everything you use in your Rig and size Fuses and Breakers accordingly.
What Size (Gauge) Wire: - The components featured in this blog will come with appropriate length and size of wire, as well as instructions on how to connect. Be sure you follow the Warnings and Guidelines specific to your setup, and consult a Pro if you aren't sure.
18 gauge (12v) and 12 gauge (120v) for wiring your interior circuits is available on the Solar Page.
Monitoring the System: - Most Charge Controllers actually display the information you need, but add on System Monitors are available and quite popular. It isn’t really a necessity up front, but not a bad idea for convenience and piece of mind. Here are a couple of popular options.
Cables and Adapters: - The items below will allow you to hook up your 30 amp Shore Power Connection to whatever power source you're likely to encounter. See the Solar Page for 50 amp Options. Note: You should always use a Surge Protector when hooking up to any unknown Power Source.
How much is all this going to cost?: - (In US Dollars) Group A could put together a decent system for $1500 - $2000. Group B could spend as little as $2300, or closer to $6000, if they go Lithium. Group C is probably looking at least $3000 if they're okay with AGM. That number could easily be over $8000 if they go with high end Batteries and 50 amp service.
It's a hefty price tag, which is why we say, “Start small and scale up.” and “Adjust your lifestyle.” - Then again, that's about what you might expect to spend on a cheap used car. - A well maintained Solar Setup is much more valuable than an old Ford, and will last much longer.
You could save around $500, if you start without Shore Power and Engine Charging (click the image to enlarge), but you’ll definitely want them eventually.
We hope this helps!: - Once again, this Tutorial is intended to simplify the process of getting on The Road by showing what is necessary to build a functional Solar System, appropriate for your needs. Hopefully it saved you countless hours of videos and research, to say nothing of the stress and confusion. - If it still isn’t making sense, you might want to have a scroll through our Solar 101 Tutorial to help it ‘click’.
As always, “Freedom is closer than you think!”
Quick Links:
Start The Engine - Establishing a Budget - Making a Living on The Road - Choosing a Rig - Do I Need A CDL? - Designing a Skoolie Build - Step By Step Build Order - Skoolie Toolbox - Doing a Build On The Cheap - 10 Tips to Save Power and Money - Skoolie Build Ideas - Solar 101 - “Inverter/Charger/Switch” or 3 Separate Devices - Simple Solar - Solar Cheat Sheet - Step by Step Solar - Water Setup - Propane Setup - Skoolie, Van, & RV Air Conditioning DE_Mystified! - Skoolie Heating - Insulation - Digital Nomad Connectivity - Choosing a Domicile State - Converting a Commercial Title - Van, Skoolie, and RV Insurance - Camping Clubs, Subscriptions, and Passes - Road-Skool / Home-School - The Simple Skoolie Kitchen
Jump To Page:
Home - Tutorials - Solar - Cooking - Refrigeration - Water - HVAC - Tech - RV Accessories - Gear - Swag.


